
As an Amazon Associate, I earn from qualifying purchases. This post contains affiliate links. If you shop through them, I may earn a commission at no extra cost to you.
I was going to narrow this down to just a few ideas, but then I thought, why not keep them all? I love making my tables pretty, and these are fun to do with family and friends. There are two ideas for Thanksgiving, strawberry Santas for Christmas and four ways to decorate with a little holiday glow.
Add a little magic to the holidays by making them extra special with fun treats and decorations you can create with family and friends.
Pick whichever one looks fun to you, and start with what you already have. A pretty platter, a glass jar or a ribbon you love might be all the inspiration you need.
Two ideas for Thanksgiving and Friendsgiving
1. Thanksgiving turkey charcuterie platter
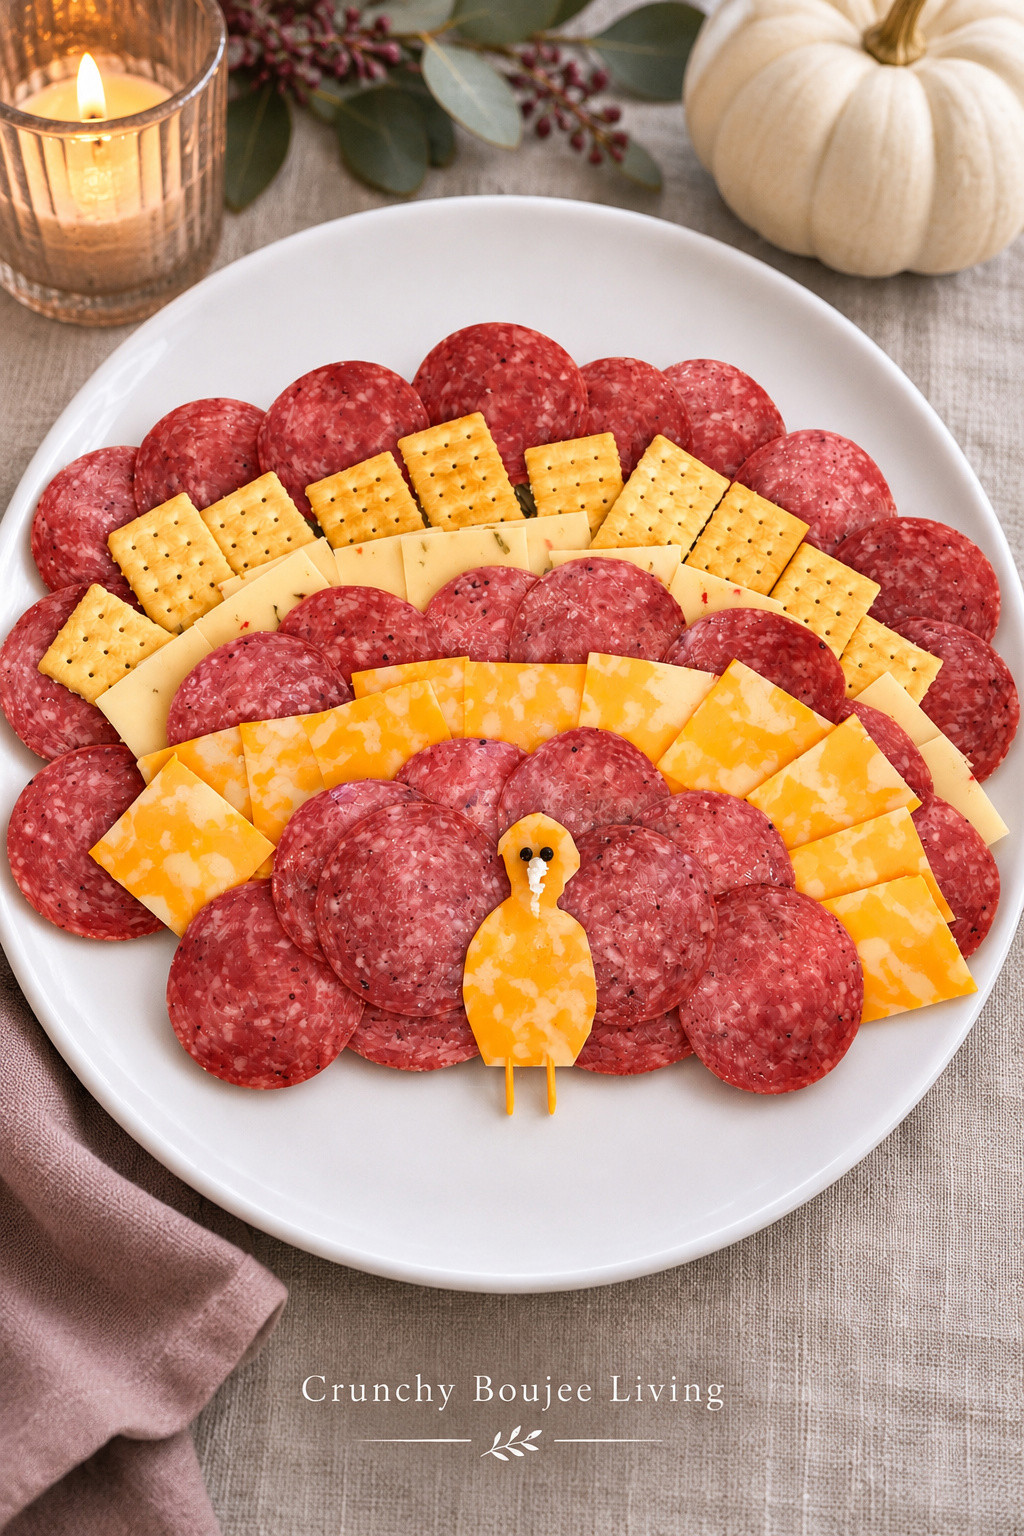
I made a turkey platter many years ago for Thanksgiving, and I thought it would be fun to share the idea! A fan of cheese, crackers and folded salami makes a playful turkey-shaped platter for Thanksgiving or Friendsgiving.
What you need
- A large food-safe platter
- Sliced cheese in two colors
- Crackers
- Ready-to-eat sliced salami, or another ready-to-eat deli meat you prefer
- A thicker slice of Colby Jack cheese for the body and head
- Tiny olive pieces for the eyes, a little white cheese for the beak, and optional cheese strips for the legs
How to arrange it
- Wash and dry the platter. Prepare ingredients with clean hands and utensils.
- Start at the back with a broad semicircle of folded salami. Layer smaller arcs of cheese and crackers toward the center to create the tail feathers.
- Cut the body and head from Colby Jack cheese and lay them at the front of the fan. Add tiny olive pieces for eyes and a little white cheese for the beak. Thin cheese strips can make edible legs. This is an easy toothpick-free alternative to the legs in the styled image.
- Keep extra crackers separate until serving so they stay crisp. Refill the platter in small batches rather than leaving all the meat and cheese out at once.
Food safety: Keep perishable ingredients refrigerated until serving. Refrigerate leftovers within two hours, or one hour if the temperature is above 90°F. Label common allergens and use age-appropriate pieces if children are eating. If using toothpicks for decoration, make them visible and remove them before serving. Cheese-strip legs avoid that extra step.
2. Rosemary and cranberry floating-LED centerpiece
Red cranberries and green rosemary look beautiful through clear glass. This centerpiece works for Thanksgiving or Friendsgiving, then can be refreshed for a Christmas table. Use floating LEDs made for water so there’s no real flame near the greenery.

What you need
- Clean, watertight glass cylinders or bowls
- Fresh cranberries and rosemary sprigs
- Water
- Water-rated floating LED candles, used according to their instructions
How to make it
- Place the empty vessels on a waterproof tray or other stable, protected surface.
- Add a small amount of rosemary and cranberries, then pour in water, leaving space below the rim. Cranberries will float; the rosemary may move as you add water.
- Set the floating LED lights on the water, keeping the surface clear enough for each light to sit freely. Follow the product’s instructions for activation and water exposure.
- Group the vessels at varied heights, without blocking conversation across the table.
Important: Ordinary battery candles and LED pillars are not substitutes for water-rated floating lights. Do not submerge batteries, remotes or products that are not designed for water. This is a temporary display: refresh the water and discard botanicals if they deteriorate. Do not eat the decorative ingredients afterward.
Shop the Royal Imports glass cylinder vases · Shop the Homemory waterproof floating LED candles
The vase link is for the glass vessels. Use floating LED lights rated for water for this project, rather than any real-flame candles included in a vase set. Check that the 3-inch floating lights fit the vessel openings and have room to float freely, and follow the product instructions for water activation and battery care.
A Christmas party bite
3. Strawberry Santas with cream cheese filling
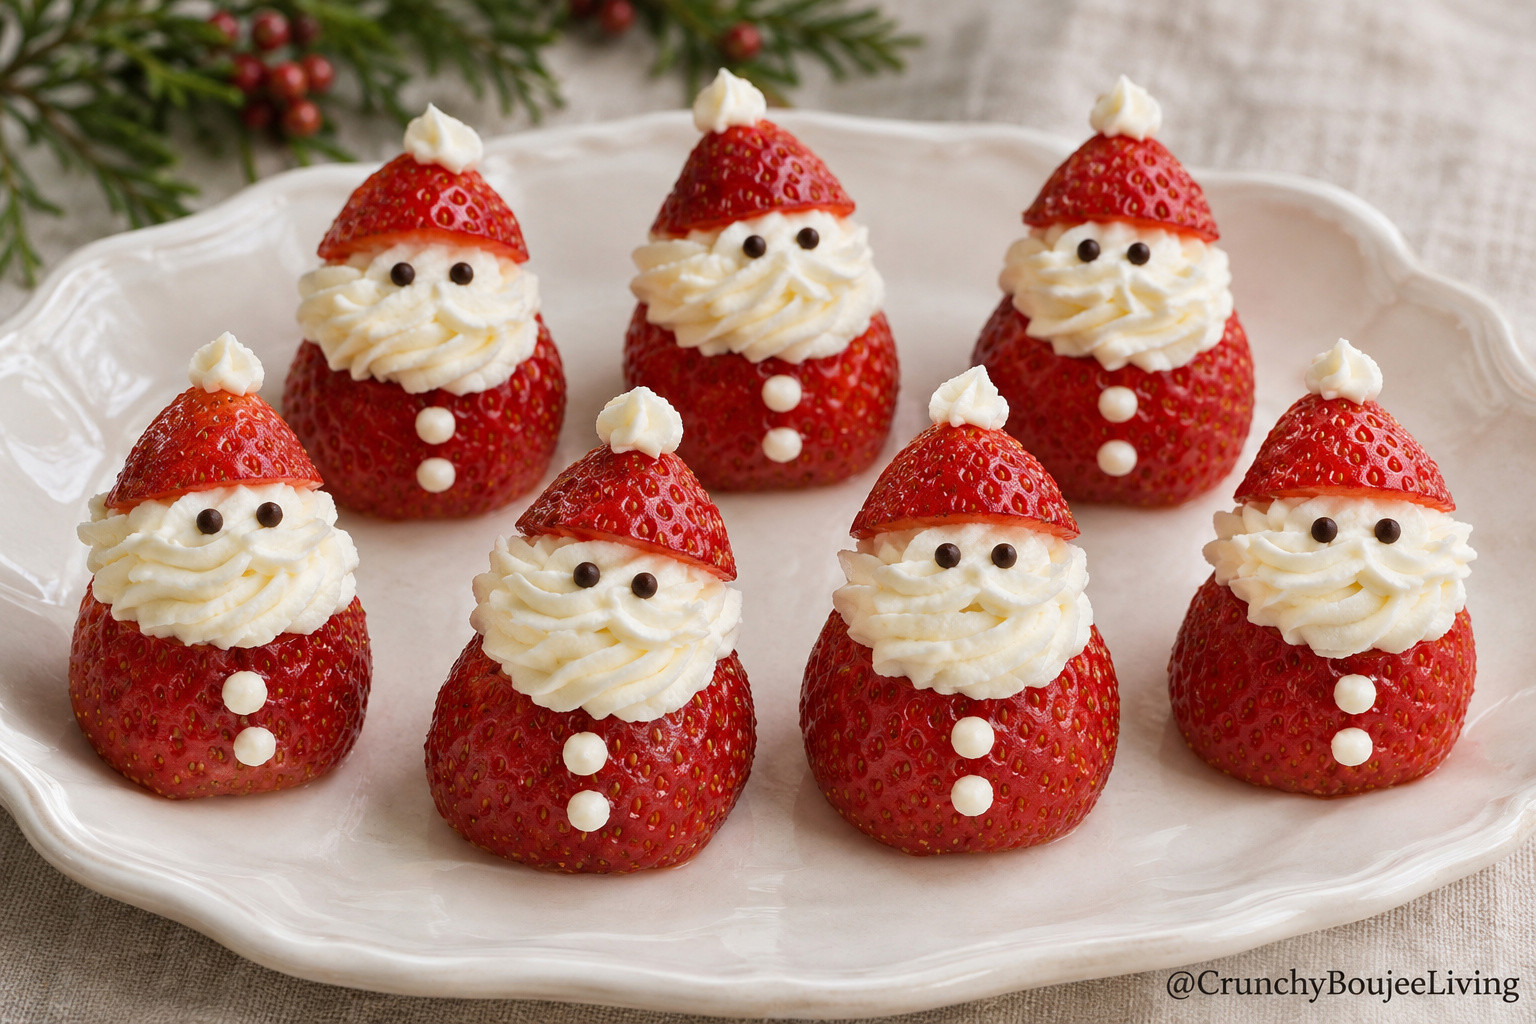
I’m going to try making these strawberry Santas this year! How cute would these be on a Christmas platter? A creamy middle becomes Santa’s face, and the strawberry tip makes his hat. Make them close to serving so the berries and filling look their best.
What you need
- 12 large strawberries
- 4 ounces plain cream cheese, softened just enough to mix
- 2 tablespoons powdered sugar, plus more to taste
- Mini chocolate chips for eyes
- A piping bag or small food-safe zip-top bag, a knife and a serving plate
How to make them
- Wash the strawberries under running water and dry them thoroughly. Remove the leafy tops and cut a flat base so each berry stands upright.
- Cut the pointed tip from each strawberry to make a little hat. Keep each hat with its base.
- Mix the cream cheese and powdered sugar until smooth. Taste and adjust the sweetness if needed. Spoon the filling into a piping bag, or snip a small corner from a food-safe zip-top bag.
- Pipe a small mound onto each strawberry base. Set its hat on top without pressing the filling flat.
- Add two mini chocolate chips for eyes and a tiny dot of filling at the tip of each hat. Optional dots down the berry make little buttons.
- Refrigerate promptly on a covered tray and bring out small batches at serving time. Keep refrigerated until ready to eat and enjoy the same day for the best texture.
Serving note: These contain dairy, and the chocolate may have additional allergens. Keep chilled at 40°F or below. Discard if left out longer than two hours, or one hour above 90°F. Skip toothpicks and serve appropriately cut portions for young children.
Holiday decorations for Christmas and winter
4. Holiday lanterns with velvet and plaid ribbon
I’m planning a holiday table of my own and leaning toward one of these ideas. I haven’t made up my mind yet, so you’ll have to wait for the reveal! The red velvet and tartan ribbon gives these glass lanterns such a festive finish. Twist one of the ribbon tails so you can see the plaid side, too. A pair at different heights makes a pretty entry-table or mantel display.

What you need
- A glass lantern with a ring handle
- A flameless LED candle that fits inside, or the candle supplied with your lantern
- Wide double-sided velvet and plaid ribbon
- Scissors
How to make it
- Check the lantern’s usable interior dimensions and the candle’s diameter and height. Install batteries according to the candle instructions, then place it securely inside.
- Loop ribbon through or around the ring handle and tie a bow. Turn one loop or tail to show the plaid side.
- Trim the ribbon ends neatly and arrange the lantern on a stable surface. If you have two, stagger their heights rather than lining them up evenly.
Styling tip: Keep the surrounding decorations simple so the bows stand out. A little greenery beside the lanterns is enough.
Use flameless candles only for this decorated arrangement. Keep ribbon clear of switches and battery access. Check whether your lantern already includes a candle before buying extras.
Shop the dark-red velvet and tartan ribbon · See the Nimiko flameless candle set
Shop the brass candle holders with glass domes, large and small. Check the usable interior dimensions before choosing candles; the listed overall measurements are not the same as the space inside the glass.
5. Cinnamon-stick flameless candle wrap
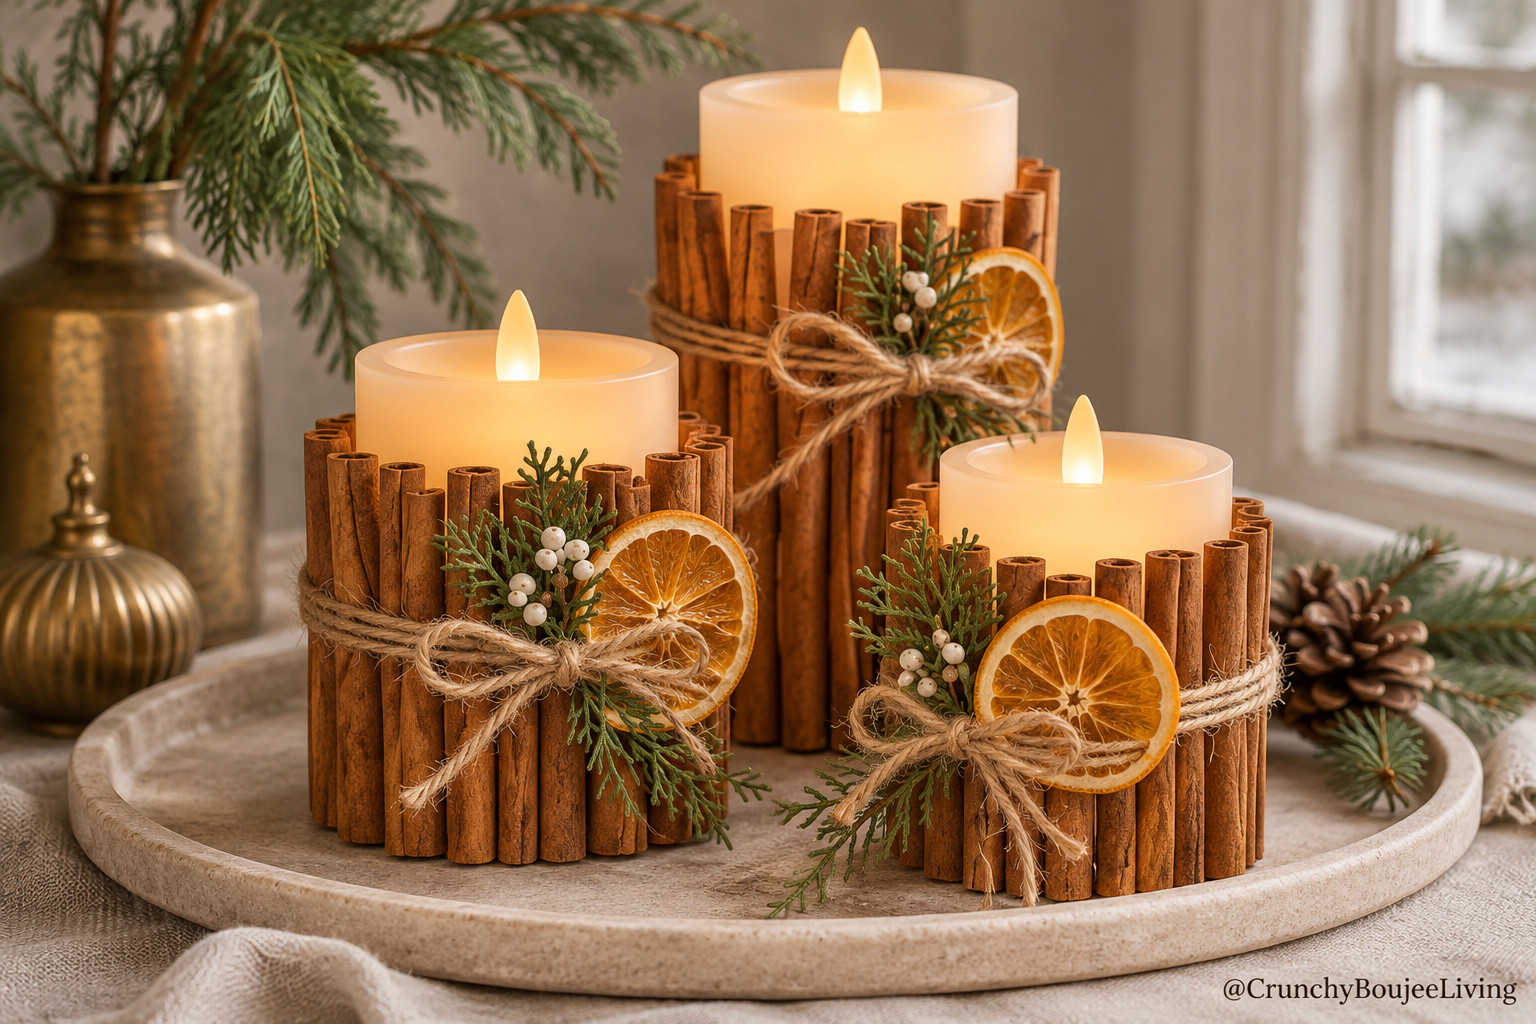
Cinnamon sticks and twine give a plain candle a rustic holiday look. A small dried-orange accent adds color without needing much else.
What you need
- A flameless LED pillar candle
- Cinnamon sticks in similar lengths
- Twine and scissors
- Optional dried-orange slice or a small decorative sprig
How to make it
- Choose cinnamon sticks that sit below the candle’s LED tip. Set the candle on a stable surface.
- Arrange the sticks upright around the outside. Work in small groups, holding them in place while you loosely wrap twine around the middle.
- Add a second wrap of twine, tighten gently and tie a secure bow. If you are gifting it, check that none of the sticks can slide out.
- Tie on a dried-orange slice or tuck a small sprig under the twine. Leave the bottom battery compartment accessible.
Safety note: This is for a flameless LED candle only. Do not use a real flame with cinnamon sticks, twine, dried fruit or greenery. Keep decorative pieces out of reach of pets and small children.
Shop the optional Christmas decorative pick kit for finishing touches. Check the listing for included quantities; you may need extra cinnamon sticks for a complete wrap. The kit is for decoration only, not food.
See the Bayglow flameless pillar candle option. Choose a size that works with the length of your cinnamon sticks, and leave the LED tip and battery access clear.
6. A simple flameless candle display
If you would rather skip the crafting, try this one. A few flameless candles at different heights, glass holders, garland and ornaments can make a table feel ready for company.

What you need
- Three flameless LED pillar candles in varied heights
- A stable table or display surface, with an optional tray or runner
- Glass cylinder holders sized for the pillar candles
- Decorative garland
- Velvet ornaments and optional gold ornaments
- Optional flameless LED taper candles in compatible holders and an LED votive in a suitable holder
How to style it
- Set the glass holders on a stable, level table or display surface. Place the tallest pillar candle toward the back, with the smaller ones slightly forward.
- If you want the fuller look in the image, add flameless taper candles in secure, compatible holders behind the pillars and an LED votive toward the front. Leave space between the holders.
- Arrange the garland around the bases without tipping or concealing the holders. Keep controls and battery compartments accessible.
- Nestle velvet ornaments and optional gold ornaments among the garland on the table, where they cannot roll off. Keep them outside the candle vessels.
- Switch on the LEDs and set timers according to the candle instructions, if available. Use flameless candles only with this decorated arrangement.
Use on a console, sideboard or mantel away from heat and moisture. Unless the product is rated for outdoor use, keep it indoors. Secure battery compartments and keep loose batteries away from children and pets.
Shop the Nimiko flameless pillar candles in varied heights · Shop the Royal Imports trio of glass cylinder vases
For this display, use the tall flameless pillar candles in dry glass vessels, not floating LEDs. Check each vase’s interior width and height against the candle dimensions before purchasing; leave room to insert and remove the candle easily. Do not add water to these battery-operated pillar candles.
The linked products are separate items. The optional votive and its holder, and gold ornaments, are not included in these recommendations.
For a more festive table: Shop the decorative garland · Shop the velvet ornaments
Optional extras: Shop the brass taper candle holders · Shop the Homemory flameless LED taper candles. The holders and candles are separate products. Compare the candle base diameter with the holder opening and check that the candles fit securely before purchasing.
7. Snowy winter candle jar
A textured glass jar and a little twine can turn a simple LED tea light into a winter decoration. Keep the finish on the outside of the jar so the inside stays clean and the light can be removed easily.

What you need
- A clean, dry glass jar
- Craft decoupage glue suitable for glass
- Epsom salt, a brush and a tray to catch excess
- Twine, optional greenery and a flameless LED tea light
How to make it
- Remove labels and clean and dry the jar thoroughly.
- Brush a thin, even coat of decoupage glue onto the outside, keeping glue away from the rim and interior.
- Sprinkle Epsom salt over the wet glue while holding the jar over a tray. Tap off loose crystals and let it dry for the full time specified on the glue label.
- When dry, tie twine around the neck and add a small sprig if desired. Place the LED tea light inside.
Care note: Use an LED tea light only. The textured coating may shed and is not washable or weatherproof. Keep it indoors, away from moisture, food and pets, and store it carefully. Follow all glue and battery-product instructions.
Shop the optional Christmas decorative pick kit for a festive accent around the jar neck. Check the listing for included quantities and components. These pieces are decorative only and must be kept away from food, pets and small children.
Make it your own
Use the colors and little details you love. Red plaid feels festive, a soft blue bow is pretty for winter, and twine keeps things simple. You could each make a different version with family or friends and see how they turn out!
Save the idea you love and come back when you are ready to make it. For more simple handmade gift inspiration, visit Self-Care Sunday: 3 Easy DIY Gifts From the Heart.
A little note about the images: These are AI-generated images for inspiration, except for my original Thanksgiving turkey platter photo, where I only changed the plate color and background using AI. These images are just inspiration, so your finished creations may look a little different, and that’s part of the fun! Make them your own. I’m planning to try making one of these myself! Let’s have fun and make some creative memories with our loved ones. If you make one, tag @CrunchyBoujeeLiving. I’d love to see what you create! ❤️💚 Happy Holidays! 🫶 CBL